terça-feira, 6 de outubro de 2015

Uber Chic Uber Mat Full Review & Nail Arts

Hi guys! :)

Today I bring you my review of the Uber Chic Uber Mat! :D I was and am super excited with this mat and wished it was released years earlier because it would have saved my current secretary of nail polish messiness hehe. 

Hoje trago-vos a minha review do tapete Uber Chic Uber Mat! :D Estava e estou super animada com este tapete e bem desejava que tivesse sido lançado há anos atrás... tinha salvado a minha pobre secretária de muitas sujidades haha!
But what am I talking about? The Uber Mat is a flexible, transparent, acetone resistant silicone mat meant for several purposes. The most important one to me is to protect the surface of where I do my nails; it is a barrier that protects against polish spills and stamping mess. When you're done, you simply clean it with acetone with no prejudice to the mat and you're good to go! :D Being a silicone mat, it is then possible to do all sorts of nail art on top of it, apply a coat of top coat and peel the nail art and then place it your nails :D You can stamp, design, paint, splatter, etc and conveniently peel it off and size it to your nails :) It's a large mat and I attached a picture with stamping tools so you can have an idea pf the size.

Mas do que é o Uber Mat?? Refiro-mo a um tapete de silicone, flexível, translúcido e resistente a acetona que cumpre várias finalidades. O mais importante para mim é que serve como barreira e protege a minha secretária de salpicos e "pequenas desgraças" que acontecem com vernizes hehe. Quando terminarem a manicure, basta limpar tudo com acetona e algodão como se nada tivesse acontecido! :D (perfeito!). Como se trata de um tapete de silicone, é possível fazer qualquer tipo de nail art em cima deste, incluindo adesivos de carimbo, esponjados/gradientes, pinturas, etc. e no fim, levantar facilmente os adesivos e colocar nas unhas :) É um tapete bastante grande como podem perceber pela imagem (com materiais para carimbar e verniz que vos dá uma noção do mesmo).
There are two important notices: 1) always apply a clear coat of top coat in the mat ro act as base and 2) always use a firm stamper and not a squishy/marshmallow one because it peels the design right off the mat. Below are two examples: in the first picture I stamped with a marshmallow stamper and then with a firm stamper directly on top of the mat (you can see that none works well). On the second picture, I stamped over a clear coat of top coat, first with a marshmallow stamper and then with a firm stamper (the firm stamper over a clear coat of top coat is far the best one!).

Há dois pontos importantes a ter em atenção quando usam o tapete: 1) usem sempre um verniz transparente como base para então criar a nail art por cima e 2) usem um carimbo firme e não usem um carimbo pegajoso/marshmallow porque este agarra ao tapete e puxa o desenho, fica terrível.  Na foto abaixo podem perceber como carimbar directamente no tapete sem base não funciona (na esquerda usei o carimbo marshamallow e na direita o firme); Na imagem seguinte usei uma camada de base e carimbei por cima com a mesma ordem de carimbos - é evidente como o carimbo firme sobre base transparente providencia o melhor resultado!
I would also for you to notice the right up corner where there is three circles. The idea behind them is for us to pick and try out colors and combinations. I for example tried three combinations in the colors below and understood that the red/gold one need more thoughts haha while the other are ok ;) Please notice that nail polish don't stain the mat nor do the designs get stained by the mat; however, higly pigmented stamping polish such as the infamous Mundo De Uñas Mexican pink do stain the mat.

Quero chamar a vossa atenção para os três círculos do canto superior direito. A ideia é testar cores e combinações de vernizes nesse cantinho. Experimentei algumas combinações e percebi que a vermelho/dourado precisa de melhorias por exemplo hehe. É de notar que apesar dos vernizes não reagirem nem mancharem com o tapete, os vernizes de carimbo super pigmentados (como o afamado Mundo de Uñas Mexican Pink) mancha o tapete da mesma forma que mancha a borracha de carimbo.
I have used the Uber Mat several times before since I own mine. For the purpose of this review I prepared two examples for you. The first one is a nail art entirely done on the mat. I started by applying a coat of Posé Base Coat in the guide fingers (they're cute!). Then, I randomly placed dots of colors  and pressed down with Uber Chic XL Non-Sticky stamper. I let that dry for a bit (you will notice its dry when the silicone mat forms sort of a "dome" and you lift the design). Then, I stamped directly on that mash of colors with Mundo de Uñas Black and Uber Chic UC 4-03 stamping plate. Afterwards,  I sealed everything with Seche Vite Top Coat, let dry, peeled off the decals and placed them on my nails, followed at last by one last coat of Seche Vite Top Coat :)

Já usei o tapete Uber Mat por várias vezes, mas preparei dois exemplos de manicures especificamente para esta review. O primeiro trata-se de uma manicure feita inteiramente no tapete e transferida no último passo para as unhas. Comecei por aplicar uma camada da base Poshé nas unhas guias do tapete. Depois coloquei bolinhas de vários vernizes aqui e ali e pressionei os vernizes com o carimbo Uber Chic UC XL Non-Sticky (não pegajoso) para ter um base engraçada. Neste momento convém deixar secar - notam que estão seco porque forma-se uma espécie de doma no tapete e o adesivo pode ser levantado. Carimbei directamente nos adesivos com o desenho da placa UC 4-03 e verniz de carimbo Mundo de Uñas Black. Selei tudo com o top coat Seche Vite e aguardei que secasse completamente para então retirar cada adesivo e colocar nas unhas. E para terminar, mais uma camada de top coat somente para garantir que tudo aderiu à unha :)
The next nail example is a stamping decal with Fall leafs. It also started with a coat of Poshé Base Coat applied on the mat. I let it dry for a few seconds and then stamped the leaf pattern from Uber Chic UC Halloween-01 stamping plate with DRK Dourado Elegante stamping polish. I picked several fall colors and painted each leaf with them using a dotting tool. In the meantime, I painted my nails with China Glaze Side-Saddle and finished the decals with a coat of Seche Vite, let them dry for, peeled them off and applied them in my nails. I loved the outcome, but further more the matt version *-* What do you think?

O exemplo de manicure seguinte é um adesivo de carimbo Outonal. Tudo começou com uma camada da base da Poshé em cada unha guia. Carimbei o desenho de folhas da placa Uber Chic UC Halloween-01 com o verniz de carimbo DRK Dourado Elegante, sendo que depois preenchi cada folha individual com vários vernizes Outonais. Entretanto, pintei duas camadas do verniz China Glaze Side-Saddle nas unhas e terminei os adesivos de carimbo selando-os com uma camada do top coat Seche Vite. Deixei os adesivos secar, retirei-os do tapete e coloquei na unha. Terminei com top coat matte e pronto, fiquei encantada *-* Que acharam?
Phewwww, this was a huge post! I'm sorry for its length, but I felt that I should (and should always) review the products I receive to the best of my abilities :) Soooo, what do you think of the uber mat?? Isn't it amazing? haha Yes, and you should get it too! They're available at the international website. Stay well and kisses,

Jasussss que post longo!! Lamento a quantidade de texto deste post, mas acredito que tenho sempre de rever um produto da melhor forma que conseguir :) Entãoooo o que acharam do tapete?? Não é incrível? *-* É e sim, devem comprá-lo! O tapete está disponível para compra pelo site internacional da Uber Chic por cerca de 13.50€. Beijinhos e até breve,

Uber Chic Website: http://uberchicbeauty.com/

Cristina Santos***
*Products provided by Uber Chic Beauty for my honest and unbiased review 
*Produtos cedidos pela Uber Chic Beauty para revisão honesta e imparcial

domingo, 4 de outubro de 2015

Messy Mansion MM 52 Stamping Plate Review

Hola guapas! :)

Today I have my review of Messy Mansion MM 52 stamping plate to share with you, as well as two manicures with it :) 

Trago-vos hoje a minha review da placa de carimbo Messy Mansion MM 52, bem como duas manicures que fiz com a mesma :)
Messy Mansion MM 52 stamping plate has an aztec theme. It's a different plate from the ones on the market and it's actually the first aztec plate I own. About the stamping quality, I found no flaw at all. The designs are well etched and transfer perfectly to the nais. If I was picky, I would point out the absence of a backing... but that's not negative at all (just girly) because it allows for easier cleaning :)

Como já perceberam, o tema da placa Messy Mansion MM 52 é asteca. Contém desenhos muito diferentes do que já existe no mercado com este tema (muito  pouco por sinal). É aliás, a primeira placa asteca que tenho :p. Quanto à eficiência de carimbar, a placa é perfeita e os desenhos estão bem gravados, sendo que transferem muito bem para as unhas. Não tenho nenhum defeito a apontar. Mas se for picuinhas, posso referir que a placa não tem uma parte de trás protectora, mas tal não é negativo porque facilita a limpeza da mesma :)
An aztec plate surely calls for an aztec manicure, right?? Although I understand nothing of what the pattern mean, I still loved the out come haha! This manicure started with a gradient between two sand textured polishes: Esmalteria da KK Champagne-me (light nude with gol shimmer) and Love Me Tender (gold with copper shimmer). Afterwards, I stamped several patterns from MM 52 plate with DRK Marrom Metálico stamping polish et voilá! :)

Isto não tinha por onde enganar hehe. Com uma placa de tema asteca, óbvio que ia fazer uma manicure no mesmo âmbito :p A verdade é que não percebo nada do que representam os desenhos, mas adorei o resultado final! Esta manicure começou com um gradiente usando os vernizes de acabamento arenoso Esmalteria da KK Champagne-me (nude com shimmer dourado) e Love Me Tender (dourado com shimmer cobre). Por fim carimbei com o verniz DRK Marrom Metálico et voilá! ;)
The second manicure I did is a more soft. I picked the triangle shape of the plate and made a stamping decal with reverse stamping. Tribal geometric patterns are quite in these days and that was my goal ;) Among the several colors used, the stamping polish was DRK Marrom Metálico (once more :p). In the pinky and thumb nails I applied two coats of Elke Meteorito which has a brown textured matte finish filled with gold and red shimmer. It's actually quite gorgeous! In the other nails there's three coats of Barry M Gelly Huckleberry and everything was mattified with Mollon Pro Top Coat Matt <3

A segunda manicure é algo mais suave. Sabem que os padrões tribais estão bastante in actualmente, por isso escolhi o triângulo da placa e fiz um adesivo de carimbo. Usei vários vernizes e o de carimbo foi o DRK Marrom Metálico (uma vez mais :p). No dedo mindinho e polegar apliquei duas camadas do verniz Brasileiro Elke Meteorito. Tr   v   ata-se de um verniz arenoso castanho matte com shimmer e brilho vermelho e dourado. É lindo! Já nas outras unhas apliquei o Barry M Gelly Huckleberry (azul) e Coconut (nude) e finalizei com top coat matte <3
Do you like this plate? What was your favorite manicure? Messy Mansion stamping plates are available through their international website as well as American warehouse. Kisses,

Gostaram da placa? Qual foi a manicure que mais gostaram? As placas de carimbo da Messy Mansion estão disponíveis para compra através do seu site internacional ou armazém americano. Beijinhos,

Cristina Santos***
*Products provided by Messy Mansion for my honest and unbiased review 
*Produtos cedidos pela Messy Mansion para revisão honesta e imparcial

sexta-feira, 2 de outubro de 2015

GL Nails Royal Gossip Gel Polish Collection Review

Hello gorgeous! :)

Here I am today with something a bit unusual to me, a full collection review! You know I like to use my polishes with a nail art, but since GL Nails is releasing their new Royal Gossip gel polish collection this weekend, I had to make an exception! :) And if you're wondering, this weekend a beauty fair named In Beauty is taking place here in Lisbon and yes, I'm attending on Saturday! (exciting!). The Royal Gossip collection belongs to the Color One line and is composed of five different red - I assure you there's something for everyone!

Aqui estou eu com algo pouco usual no blog, uma colecção inteiramente revista num só post! Sabem que prefiro usar cada verniz com uma nail art, mas visto que a GL Nails vai lançar uma das suas novas colecções este fim de semana, tinha que fazer uma excepção! :) Fim de semana? Ah pois é! Refiro-me ao evento In Beauty - Feira de Cosmética e Beleza a decorrer no dia 4, 5 e 6 de Outubro na Meo Arena em Lisboa (e sim, eu vou no Sábado :p). A colecção chama-se Royal Gossip e é composta por cinco vermelhos diferentes (garanto-vos que há um vermelho para cada uma de nós) e é um verniz gel trifásico (a marca designa por Color One).
Overall, these gel polishes have the same characteristics, so lets start with that. Being a Color One gel polish (7ml), it means that base, color and top coat are already included in the formula (monophasic formula). One must file and clean the nail, then apply the gel polish and cure it under a lamp and you're good to go! :) All the gel polishes are very pigmented and apply in two coats. I have to mention that GL Nails Lipe and Ariel are the most pigmented ones and a single coat can be enough to cover the nails. About curing time, it takes 1 min in a LED lamp or two minutes per coat in a UV lamp. Formula was very easy to work with and the shine is quite glossy. However, I noticed a flaw. The gel polish shrank away from the cuticle line in the first coat. I had no oil in my nails because I previously cleaned them with alcohol, so I have no idea why this happened. I had to cure each nail individually to avoid the shrinking. 

Vamos começar pelos aspectos gerais visto que são praticamente idênticos em toda a colecção. Como se trata de um verniz gel monofásico, a base, cor e brilho estão incluídos na formula; só têm de limar e limpar a unha, aplicar o verniz gel, curar e já está! :) Todas as cores (7ml) são pigmentadas e necessitam somente de duas camadas. Ressalvo o GL Nails Lipe e o Ariel que são tão pigmentados que uma camada é quase suficiente para cobrir as unhas. O tempo de cura é de 1 min com lâmpada LED e 2 min em lâmpada UV. A formula é fácil de aplicar e não escorre para as cutículas. O brilho também é muito bom! Contudo, constatei algo negativo. O verniz gel começou a escolher junto ao contorno das cutículas na primeira camada em cada unha e não consigo perceber o motivo (a unha estava limpa com álcool, sem a mínima gordura que justifique tal). Terei de testar com primer e ver se acontece o mesmo. O que acabei por fazer foi curar dedo a dedo para não dar tempo do verniz gel encolher. 
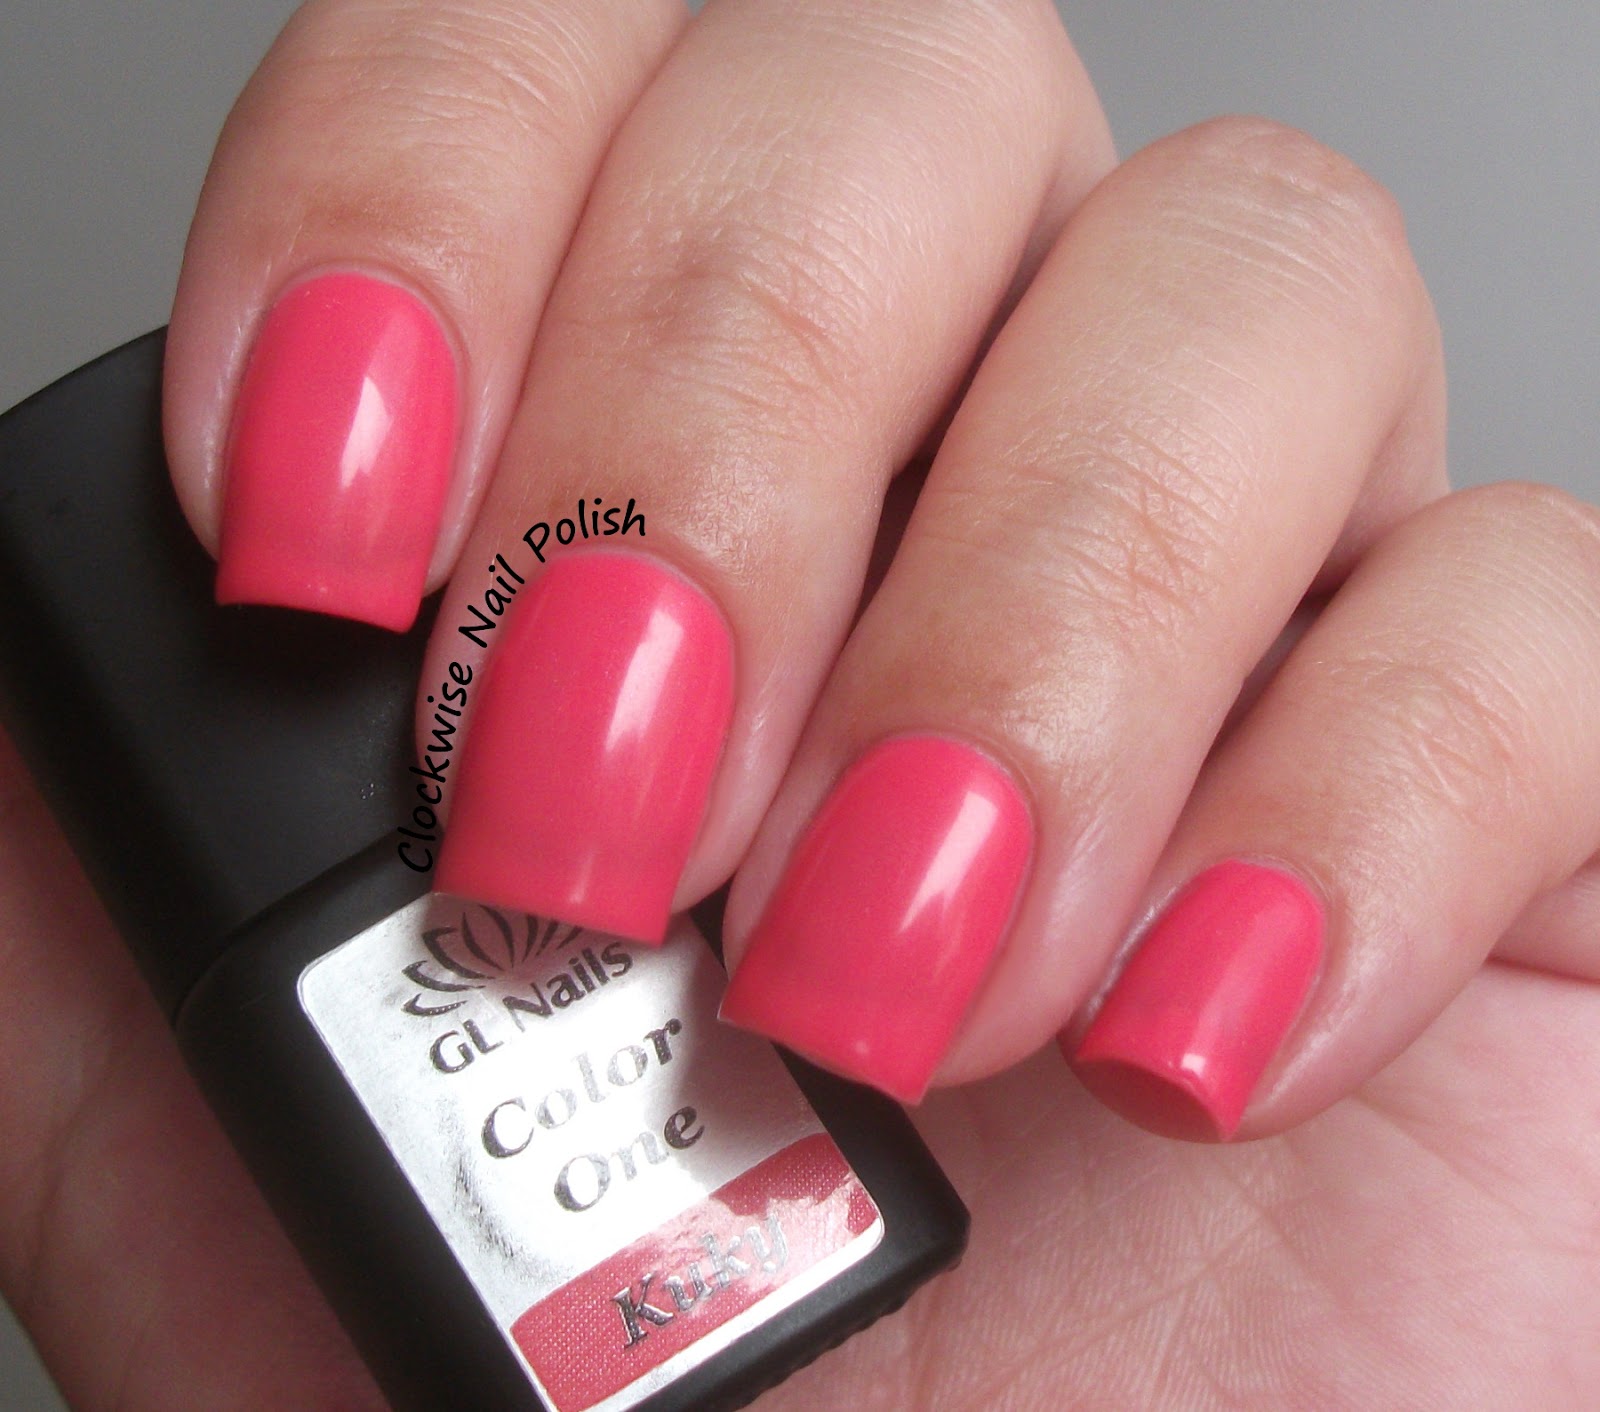
Let's start with GL Nails Kuky. TIt has a cute watermelon color, not dark at all.

Vamos começar pelo GL Nails Kuky que tem um tom vermelho melancia claro.
Then we have GL Nails Sunset. There's some orange undertones in this red so I fully understand the name.

De seguida temos o GL Nails Sunset. Trata-se de um vermelho com evidente nuance laranja, daí que entendo perfeitamente o respectivo nome. Consigo imaginar muito bem esta cor numa nail art em jeito de pôr do sol... :p
Now we have GL Nails Vega. We are now entering a darker range of reds, although Vega is a lighter red with some pink undertones.

Estamos agora a entrar nos vermelhos mais escuros da colecção com o GL Nails Vega. Mas o Vega é a versão mais clara e tem também um pequeno toque de rosa na formula.
Meet GL Nails Lipe - my favorite!! *-* It's gorgeous! haha. Lipe has a bright, dark and glossy red color. It's so sexy!! 

Agora temos o verniz gel GL Nails Lipe - o meu favorito *-* O Lipe tem um tom vermelho escuro, vibrante e absolutamente sexy! 
Last but not least, here's GL Nails Ariel. I can see this one enchanting many hearts this Fall. It's a dark, glossy red with a sexy feeling to it as well. My second favorite (clearly haha).

E por fim temos o verniz gel GL Nails Ariel. Acredito que esta cor vai arrebatar muitos corações este Outono <3 É o vermelho mais escuro da colecção e tem aquele tom que seduz e desperta o olhar. É claramente o meu segundo favorito da colecção hehe.
You must tell me, what was your favorite red gel polish?? GL Nails gel polishes aren't available worldwide, but you can get them by directly contacting the brand :) Kisses,

Contem-me, qual é o vosso vermelho preferido?? Esta colecção estará em breve disponível para compra pela loja online da GL Nails. Mas se forem à In Beauty, suspeito veementemente que vão estar com desconto de lançamento haha. Se me encontrarem na In Beauty, por favor falem e não se acanhem! :) Beijinhos,


Cristina Santos***
*Products provided by GL Nails for my honest and unbiased review 
*Produtos cedidos pela GL Nails para revisão honesta e imparcial

Disqus Comentários